A common question we receive from Do-It-Yourselfers is, “Does it matter which trowel size I use?”
Yes, it absolutely matters, if you want the job done right the first time, so you don’t have to tear something out and do it again!
But, how do you know which trowel size to use for the tile you’re working with?
The short & proper answer is “Use the one that gives you the proper coverage.”
That may sound vague and unhelpful to you if you’re less experienced with properly setting tile, so let’s elaborate on that so you can fully understand what that means.

Coverage means the area that makes contact between the tile and the substrate. While 100% is ideal, the tile industry standard for ceramic & porcelain tile is 80% mortar coverage in dry areas, and 95% in wet & exterior areas. For natural stone tile, the required coverage is 95%, no matter if it’s installed interior or exterior, or wet or dry areas.
Quite simply, you don’t want voids under the tile. Those voids are air pockets that aren’t bonded to the substrate (the floor or wall material you’re applying the tile to). If it’s a floor tile for example, that unbonded area can lead to cracking when moving something heavy across it like a refrigerator, or can lead to grout cracking and the tile working loose over time with repeated foot traffic.
The coverage you can achieve depends on how flat both the tile and the substrate are. The less flat the tile or substrate, the more mortar you’ll need to not have voids and to fully bond and support the tile…thus needing a larger trowel size to accomplish evenly applying more mortar needed.
Generally speaking, it’s better to have more mortar than needed than not enough.
This point may be a little basic for some, but just so we’re all on the same page, mortar is what bonds (glues) the tile to the floor or wall.
There Are Several Types of Notched Tile Trowels
- V-notched trowel – Used for applying vinyl flooring, and preferred for very small tiles like mosaics used for surrounds, backsplashes and accents in showers. V-notches are best in these cases because they help apply a smaller amount of mortar, thus avoiding over-smearing that leads to mortar squishing or oozing out from the joints, which causes a mess and extra labor to clean out the joints thoroughly before grouting.
- Square notched trowel – The most commonly used type of trowel, the notches form square ridges of mortar.
- U-notched trowel – Used interchangeably with square notched trowels. The height of the ridges/notches will equal the space between each ridge, and the width of the ridges will be double that measurement. So a 3/8″ u-notched trowel will have 3/8″ ridge height and spacing, but 3/4″ ridge width.The rounded ridge (vs a squared ridge formed by a square notched trowel) can make it easier to force out air and evenly press down ridges under large format tiles, or on walls where you have less leverage to firmly set the tile. Where square ridges tend to collapse over from the top of the ridge and then spread out, when setting and embedding tile, the U-shaped rounded ridge spreads out from the base of the ridge at the substrate level FIRST, giving less possibility of trapping air under the tile.
How Trowels Are Sized
Trowel size is determined by the size and spacing of its teeth. The first number is the width of the notches (the distance between the teeth), and the second number corresponds to the depth/height of the notch. If a trowel only has one measurement listed – i.e. 1/2″ – that means both notch width and height are the same.
When using a square-notched trowel, with equal notch and teeth sizing, the bed of thinset mortar will be half of that size after setting the tile. So, 1/2″ ridges, will become a 1/4″ thick bed of mortar as the tile presses the ridges evenly into the spaces between the ridges.
Sizes of square notched trowels and their uses:
- 1/8″ x 1/8″ square notched – Use this for applying waterproofing membranes like Kerdi, Hydroban, or USG Durock membrane.
- 1/8″ x 1/8″ V-notched – It’s not a square notched trowel, but wanted to mention it. Use it for small glass tiles and mosaic tiles.
- 11/64″ x 11/64″ square notched – Use this for Kerdi Ditra and other floor membranes/mats.
- 1/4″ x 1/4″ square notched – little bit larger mosaic tiles (such as 2″x2″), 3×6 subway tiles, and up to about 6″x6″ tile
- 1/4″ x 3/8″ deep square notched – for small to medium tiles but when the surface is a little uneven and you need extra mortar to fill those voids
- 1/4″ x 1/2″ square notched – This size is good for tiles about 12″x12″ to 16″x16″, no thicker than 3/8″.
- 1/2″ x 1/2″ square notched – for large format tiles (a tile with any side greater than 15″) – which are the most common tiles used today
In general, the smaller the tile, the smaller the trowel size; and the larger the tile, the larger the trowel size. But that’s not always the case!
Two tiles of the same dimensions, from two different manufacturers, could require different trowel sizes for proper coverage, depending on tile uniformity, flatness, back side texture, and other factors.
Tile Flatness
Tile manufacturers are allowed by industry standard, a certain amount of tolerance in how flat or “out of flat” the tile is. Most large format tiles (tiles with any side greater than 15″) especially will be slightly concave, warped, or cupped.
If you have a tile that is cupped, this means that if you were to apply mortar to the substrate evenly and equally, and set your tile, then pry it up to check for coverage, you would have coverage all around the edges but none toward the middle of the tile.
You can quickly get an eye for how flat or cupped your tile is by holding two pieces face to face and pressing together one corner. If the tile is cupped, the opposite corner will spread apart. If so, measure that gap and divide by half to determine the amount your tile is cupped. If for instance, you have a 1/4″ space between the tiles, that would equal a 1/8″ amount of cupping, and you’ll need to add that much mortar to the bed in order to get proper coverage.
That’s where back buttering also helps…
Back Buttering
Back butter or flat trowel the back side of the tile – tiles are all made differently depending on the manufacturer, with varying textures and surfaces on the back sides of the tile (such as honeycomb, diagonal grid, smooth, etc.), so applying a uniform thin coat of mortar fills the low spots and gives an even surface of mortar to bond to the mortar on the floor.
While back buttering is not an industry requirement, it is highly recommended. It can ensure you get rid of a film of dust on the back side of the tile and can increase bonding by 50%.
Use The Right Mortar Too
Using the appropriate mortar is crucial as well. Thinset is a specific kind of mortar which by it name implies it can set and bond in a thin layer. For the more commonly used Large Format Tiles today, use a mortar specifically designed for them, such as Mapei Ultraflex LFT – where the LFT refers to Large Format Tile.
Proper Troweling & Tile Setting Techniques
Direction of Notches
- All trowel marks should be in parallel with the shorter width of the tile, or perpendicular to the longest width of the tile.
- Improper troweling seen often by amateurs are swirling patterns or notches not all running parallel across the surface.
How You Hold The Trowel
- Hold the trowel at about a 45 degree angle. The more you lay over the trowel, holding it at a lower angle, the shorter you make the ridges or notches of mortar. Doing this consistently at a 45 degree angle will make sure all your ridges, from tile to tile, are the same height.
Setting The Tile
- Move the tile back and forth as you set it ONLY in a direction perpendicular to the trowel ridges. Doing so collapses the trowel ridges into the valleys, eliminating voids.
Recapping The Proper Steps Of Installing Tile
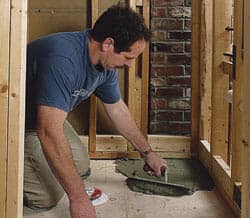
- Flat trowel mortar to the substrate first: grab some lumps of mortar from your bucket, apply to the substrate, and then spread evenly with the flat side of the trowel, which ensures all low areas are filled evenly. This process is referred to as a Key-In or Burn-In of the coat of mortar into the substrate.
- Comb mortar with the notched side of the trowel on the substrate:
- Back butter the under side of the tile:
- Place tile on substrate and move slightly side to side to press into place:
- Lift the first tile laid to check for coverage: use a putty knife or trowel to pry up the tile from one side, properly adhered tile has a lot of suction from the mortar.
- If coverage is acceptable, continue. If not, move up to the next size trowel and repeat the process.
Videos You May Find Helpful:
This is a training video put out by Schluter, a leading company in the tile supplies industry. They discuss industry standards I’ve covered in this article, along with other helpful bits of information, and demonstrate quite well how to properly trowel mortar and set tiles.
Another helpful video, not the highest quality or most refined presentation, but you could find some of what he shares to be helpful in understanding why to use certain trowels, mortars, and such.
Here’s a video from a professional tile setter, as he shares from his experience when he wants to use certain trowel sizes, and demonstrates how to properly trowel and set tile.
References & Resources:
- How To Select The Right Trowel Notch To Obtain the Required Mortar Coverage – The Ceramic Tile Foundation