The most important part of the entire shower project to get right is absolutely the floor pan! And, not surprisingly, this is where most do-it-yourselfers, make a mistake, try to make a shortcut, or just flat out get it wrong. Building the floor pan incorrectly can lead to leaking, of course, but also mold growth underneath the tile and mortar bed if a proper “pre-slope” isn’t installed.
But, I don’t want to get ahead of myself, I’ll cover all the details how to do this later in the article…
Let’s start here: What is a shower pan?
The shower pan is the part of the shower which waterproofs it, protecting the floor and surrounding walls from the effects of constant moisture exposure, such as mold & rot.
The term “pan” originates from when contractors used to install a copper pan in the base of where the shower was being built.
That evolved to lead pans, and today more modern materials and techniques are used that completely waterproof the shower but have cut down tremendously on the labor required to install them.

Backstory: How Shower Pans Were Made In The Beginning
The use of the copper pan transitioned into using 4 pound sheet lead (weighs 4 pounds per square foot, giving it that name), because it’s very malleable and could be shaped easily on site. A contractor could measure up the size needed, go out to the garage or driveway, bend up the corners as needed with a 2×6 and rubber mallet, folding corners over each other and overlapping so all the edges were at the top.
Weighing 4 pounds per square foot, it was quite a chunk to lug through the house, but could be done with two guys, and it could be folded in on itself, since it’s so malleable, in order to get through tight hallways and around corners.
Using the rubber mallet again, they would hammer an impression of the drain into the lead, giving a mark to cut out the drain hole. Once the hole was cut out, the drain flange could be attached, making a watertight seal. An adjustable shower drain was then threaded into the flange, and pea gravel placed around the weep holes to protect them from the deck mud that was installed next. Deck mud is a dry cement, wetted just enough to let the cement hold shape, allowing it to be packed in creating the slope needed for water to flow toward the drain.
The Next Phase Of How Shower Pans Were Made
Labor time was greatly reduced when the use of CPE (Chlorinated Polyethylene) sheet membranes replaced the old lead pans, first introduced in 1964 by Noble Company. It can easily be rolled out, shaped into place in the shower, excess liner folded over itself in the corners, folded over the front shower curb, and a CPE bonding adhesive is used to seal up patches over corners.
And, in the late 1970s, vinyl membranes made from polyvinyl chloride (PVC) were introduced as a cheaper, lower quality, option to CPE. It works much the same way, but doesn’t hold its shape after bending and creasing, so makes forming the corners and over curbs a bit more challenging.
A newer kind of tile shower drain was used with these sheet membranes, like the one shown below.

Time vs Money…Which Do You Have More To Invest?
Further in this guide, I’ll explain the more modern method most professionals employ today, but this method using a vinyl liner is still perfectly acceptable. Many DIYers and homeowners choose this method simply because the materials cost less, even though it does take more time to install.
It’s your choice, and simply comes down to which you have more to invest in your tile shower project; time or money.
…If you have more money to spend, and less time to put into the project, skip on down to the instructions for the latest technique to build a waterproof shower pan.
However, if you have more time to invest and are working on a limited budget, you may choose to go this route.
And, in that case, here are the steps to build a waterproof shower pan using what I call the old-fashioned vinyl liner method…
Step 1: Create The “Pre-Slope”
Here is where many who take on the task of building their own shower, without any experience doing so, go wrong.
The pre-slope is a slight slope of the floor draining toward the shower drain, created with dry-pack cement before the shower pan is installed.
Despite what you may think, water can and will penetrate all the way through the tile, mortar and concrete above the shower pan, making its way down to the shower pan.
In the absence of a pre-slope below the shower pan, the pan will be flat on the floor surface, keeping any of that water in the concrete from percolating down and into the weep holes of the shower drain. When the concrete remains moist, mold growth will occur over time, eventually causing considerable damage.
Installing the Pre-Slope:
- You should already have the shower curb formed with 3 2x4s stacked on top of each other and fastened securely to the floor.
- If building on a plywood surface, you must first lay down a layer of felt paper (isolates concrete from floor movement).
- Then, staple down a layer of metal lath.
- Mix cement with just enough water to get it to hold shape.
- Pack the mix down creating a slope from 1/8″ thick at the drain, up toward the shower edge at a slope of about 1/4″ per foot.
- On a concrete floor, the felt paper is not needed, concrete can be directly applied to floor.
Step 2: Install The Vinyl Liner
 Once the pre-slope sets up, you’re ready for the next step of installing the vinyl liner, also called the shower membrane.
The membrane is to be wrapped up the wall NO LESS THAN 3 INCHES above the intended finished height of the shower threshold (curb or dam).
Before wrapping the membrane up the sidewalls, install 2×10 board pieces between studs to give a solid support to the liner and places to nail the liner to the wall.
No nails or other fasteners are to be used anywhere except along the top perimeter of the pan liner, in order to prevent eventual leaks from occurring at the nail holes.
Wrap the membrane up and over the shower curb, fastening it on the outside of curb.
*Note: It can be quite cumbersome and tricky to get the liner to lay flat at corners and where the shower curb meets the walls. Take your time to pleat and overlap the liner in these areas, fastening to the wall at the top with a nail. This is the most annoying part of this old-fashioned method to me, and one more reason I love the more modern technique (further below in this post).

When ordering your vinyl liner, be sure to get a size that will cover the shower floor area + about 6 to 8 inches up each side wall + enough to lap up over the shower curb and down the front side of the curb a couple of inches.
Step 3: Build Up The Shower Curb
 After the rubber pan liner is installed, metal lath can be wrapped around the shower curb (which was made of 3 2×4’s nailed one on top of the other creating a 4.5 inch high threshold), and cement packed into the lath and on top of it, shaping the concrete into a smooth squared off surface for tile to be applied to.
I always take an easier route, however, and use the Kirb-Perfect product made by Mark E Industries: a plastic product easily assembled to form a cage around the lined shower threshold, instead of forming the metal lath.

Step 4: Install Concrete Board On Walls
Concrete board, 1/2″ thick 3’x5′ sheets, can then be measured, cut, and installed on walls using weatherproof screws (to keep rust stains from coming through grout later on as regular screws rust).
The concrete board should be installed leaving a 1/2″ space at the bottom between it and the pan liner, pressing the liner on the wall against the studs and 2×10 boards. Make sure not to install screws toward the bottom of the concrete board that would go through the vinyl pan liner within 3 inches of the floor.
Step 5: Build The Concrete Slope Over The Liner
Once the threshold is finished and concrete board is on the surrounding walls, it’s time to create the concrete slope inside the shower pan liner.
Be careful and take time to make the surface of the concrete slope as smooth and even as possible to allow small floor tiles to lay better when tiling.
A chalk line can be made around the concrete board on the walls for a guide line, giving about a 1/4″ – 1/2″ slope per foot up from the adjustable shower drain to the shower walls.
 Again, I take the easier and quicker route, using Mark E’s Quick Pitch kit, which includes a plastic ring to place around the shower drain (protects weep holes from being filled by concrete), and slope plastic sticks that fit into the ring and are placed around it to radiate out to the corners and sides. They can easily be cut to length with tin snips or a saw.
This gives me a perfect pitch every time, and fast!
Once you have the Quick Pitch kit in place, and a chalk line guide marked around the wall, make a dry-pack concrete mix with cement, sand, and just enough water to make it shape and pack well.
Pack the mix into the shower, following the guides of your outer chalk line and Quick Pitch plastic rails.

The Current Best Way To Build A Shower Pan
As I mentioned before, there is absolutely nothing wrong with the method I just explained to you. It is still used by many contractors and, at this point, is the least expensive route to go.
However, as you probably know, new technologies are coming along every year, revolutionizing ways things have been done in construction for decades and centuries.
 A system I use now, when homeowners have a bigger budget, utilizes products made by a German brand named Schluter. They have competitors in their market that you can compare to, but are very well-respected among professional tile setters.
Their products all work together to make a completely waterproof shower, and can be installed much quicker than the old system just explained.
Schluter contends that even if you properly install a shower with the old system as I just described, water can still stay in the concrete for a prolonged amount of time causing mold problems.
With their system, the floor and walls are waterproofed with a plastic membrane and there is no exposed concrete to absorb water below the tile. Water that goes through the tile will drain directly along the plastic membrane to the drain.
 and Linear Drain - 24 Inch Channel Body, and Stainless Steel Tileable Grate")
Check out all of the Schluter Shower Kit options here on Amazon, including length & width dimensions, drain type (standard or line drain), and drain location.
How The Schluter Shower System Works:
Using an innovative plastic membrane with fleece backing on both sides, Schluter has revolutionized the waterproofing process of a shower.
This quick 5-minute video from Schluter describes the difference between how the method previously discussed works, and how Schluter’s system works, showing the clear advantages offered with their sealed system…
Step-by-Step Building Your Shower Pan With Schluter Systems
The process is similar – but different – than the vinyl liner method previously detailed, so pay close attention. Done correctly, this method will save you a considerable amount of time.
I purchase Schluter’s Kerdi Shower-Kit that has almost all you need to build a waterproof shower ready for tile.

Before beginning the project, I highly recommend watching this thorough 20-minute instructional video from Schluter Systems on how to properly install all pieces of the Shower Kit:
Step 1: Install Concrete Board on Walls
Once plumbing and all else is ready, install concrete board to your walls, from floor to ceiling.
In the old method, the concrete board was installed close to last, being lapped over the vinyl liner that was installed first. In this case, the Schluter method includes products that will completely waterproof the pan AFTER installing the walls.
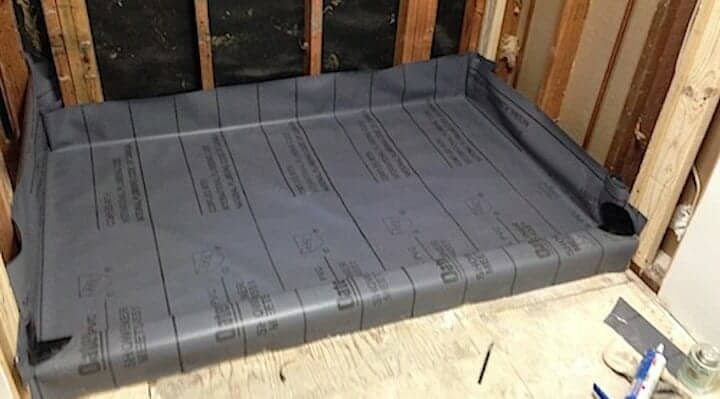
Step 2: Install the Shower Pan
The first item to use out of the kit is an expanded polystyrene shower base, or shower tray. It’s already built with the correct slope, all you need to do is cut the foam (quite easy to do with just a box knife) to fit the opening.
- Dry fit the pan to make sure it fits in the space easily. Small gaps around the sides will be filled with mortar, so you don’t have to make it touch all sides exactly.
- Mix a batch of mortar and apply with notched trowel to the subfloor.
- Set the shower base firmly into the mortar.
If the shower enclosure is larger than the size of the shower tray included in the Schluter Shower Kit you purchased, you can center the tray around the drain line, and then fill the remaining distance between the edge of the tray and the walls or curbs with dry-pack cement.
This video from Schluter Systems shows quite well how to do this:
Step 3: Shower Bench
Next, you can set a Schluter Bench in place where desired, which is basically a big block of expanded polystyrene, and it too can be cut to fit the space quite easily.
This is not included in the shower kit. The pre-made shower benches are more pricey, but they are also a big time saver…But many times I still build my own bench with treated 2×4’s and concrete board, then waterproof with Kerdi membrane, simply because it’s cheaper and I can make the bench a custom size and shape.
See the installation of a pre-made Schluter Shower Bench here:
…Or, you can also build a shower bench using Schluter Kerdi Board, as this video shows:
See many of the Schluter Shower Bench sizes and options here on Amazon.
Step 4: Install The Schluter Shower Curb
Cut the expanded polystyrene shower curb included in the Shower Kit to fit, and install it by applying mortar to the floor and sides/walls where the curb will touch. Firmly press the shower curb into the mortar, clean up excess, and let set up.
Alternatively, you can build a shower curb out of wood framing and sheathing, or masonry, and then waterproofed with Kerdi membrane, or simply build your own curb with Kerdi Board.
See what I mean here, in this video:
Step 5: Connect The Schluter Drain Piece
Next, insert the included Shower Drain disc into a generous amount of ThinSet in the center hole and glue onto drain pipe below the floor. Then clean off excess ThinSet that oozed up through the holes around the ring of the disc.
How you install the drain piece actually depends on whether you DO or DO NOT have access to plumbing under the shower floor.
If you do have access to plumbing below, the entire polystyrene tray can be installed as described above, then the drain piece installed as just mentioned, and later connecting plumbing under the floor.
However, if you DO NOT have access to plumbing after installing the shower, you’ll want to install the center circular foam piece and drain FIRST, before the rest of the shower pan.
…Not sure exactly what I mean there? Watch this video and it’ll make sense:
Step 6: Waterproofing The Shower With Kerdi
In the shower kit is a product called Kerdi, a plastic sheet with bright orange fleece webbing adhered to both sides. The plastic membrane waterproofs the shower, and the webbing provides binding contact surface for thin-set mortar to adhere to on both sides; one side to the concrete board wall, and tile on the other side.
First, apply thin-set mortar with a small-notched trowel to an area of the wall you’ll be beginning with.
Only apply mortar to an area of the wall for one piece of the membrane at a time to avoid having the mortar dry out too much before Kerdi is applied to it.
Then adhere the Kerdi membrane to walls and firmly press the membrane into the mortar with the flat side of your trowel. When installing the next piece of membrane, overlap the vertical edge over the previous piece by 2″.
This video describes how to properly overlap and create seams with Schluter Kerdi membrane and strips.

Pro Tip: Applying Kerdi to Concrete Board Walls
Wipe down the concrete board walls with a damp sponge to infuse some moisture into the surface, AND mix the mortar thinner than usual, pancake batter consistency. Otherwise, the concrete board will suck the moisture out of the ThinSet before it ever sets up, and the Kerdi will peel right off!
Once your walls (and bench if you have one) are covered with Kerdi membrane, install a piece of Kerdi on the floor, cutting out a hole for the drain. Then install a piece of Kerdi up and over the shower curb, and seal corners with Kerdi-Kereck, also included in the shower kit.
After walls, bench, floor, and curb are all covered with Kerdi membrane, install the 3″ wide Kerdi Band Strips on all corners with thin-set mortar.
Watch this video from Schluter to see how to install Kerdi Kereck and Kerdi Band in corners:
At the openings around shower valves, install included Kerdi Seal pieces just like you’ll see in this video…
Now you have the newest and best way to build a Shower Pan finished, and ready for tile!
For more in-depth details on products offered by Schluter Systems, read our Definitive Guide To Schluter Products.
Frequently Asked Questions
Q. What is the difference between modified and unmodified thinset mortar?
A. Also called dry-set mortar, unmodified mortar is a mixture of Portland cement, sand, and water retention agents that you mix with water.
Whereas, modified thinset mortar has the same ingredients as unmodified mortar with the addition of polymers, such as latex. These polymers can be a liquid additive that you add in place of water when mixing, or a powder polymer added to the mix by the manufacturer.
The polymers help the mortar set up and cure faster. This is good for use with applying tile, but if used in a case such as adhering the Schluter Kerdi membrane to concrete board walls, it would potentially dry out too fast, keeping it from properly bonding to the wall material.
Q: How thick/thin should I make the thinset mortar?
A: The answer to this depends if you’re referring to the use of the mortar with applying tiles, or for the purpose of adhering Schluter Kerdi to walls and floor in waterproofing the shower enclosure.
For applying tile to walls & floors, it’s generally best to mix the Thinset or modified mortar to the consistency of peanut butter.
When applying Schluter Kerdi to concrete board walls, Kerdi membrane to the polystyrene floor, and Kerdi Band to corners and edges, it’s best to mix the unmodified mortar to a thinner consistency, almost like pancake batter, but still thick enough to hold a notch.
Here is an instructional video from Schluter Systems that helps with this answer:
Q: Do I have to use concrete board for the shower walls?
A: If you’re applying tiles directly to the wall, you definitely want to use a concrete board or Hardi-backer board for the walls, as water exposure won’t deteriorate these materials.
However, if you’re using the Schluter Shower System and waterproofing the walls with Kerdi membrane, you can use gypsum board (drywall) with no problem, as mortar will adhere and bond to it just as well, and the membrane is removing any possibility of water exposure to the gypsum board behind it.
Q: How can I be sure my new tile shower pan doesn’t leak?
A: You can ensure your new custom shower pan is waterproof by performing a water test or flood test, before installing tile (and sometimes required by code in some areas).
Wait at least 24 hours after membrane installation is complete, to be sure mortar is fully set.
Insert a test plug in the drain hole, then fill the shower base with water. Mark with pencil or marker on the wall where the water level meets the wall. Let the water stand for 24 hours, and then check the water level at that time. If it’s still at the mark you made, you’re good to go! No leaks!