If the size of your bathroom has you limited on options for renovating & updating it, leaving you stumped with just how to fit everything in that you want, a corner shower stall could be part of the answer for you.
Good for small bathrooms, corner showers save space compared to the shape & size of a traditional bathtub…That can help free up more floor space for moving around between the shower, sink, and toilet, and can help make the room feel bigger as well.
Although it’s recommended you have at least one bathroom in your house with a bathtub for resale value (families want bathtubs for bathing little ones!), many people never take a bath and would be completely fine with only a shower in their bathroom. If that’s the case with you, perhaps you’d be fine with taking out the bathtub, rearranging layout a bit, going back with a corner shower.

Contents
- Options to Consider
- The 5 Best Corner Shower Stall Kits
- Other Brand Options To Consider
- How To Install a Corner Shower Kit
- Building Your Own Corner Shower
- How To Keep Your Corner Shower Clean

Options To Consider
Before you dive head first into your bathroom & shower remodel project, there are a handful of choices to make to ensure you end up with a corner shower that best fits your bathroom layout, your personal style & taste, and your budget.
Based on your situation, there could be more factors to consider, but here are five key options to think about…
1. Curved, Neo Angle, or Square Shape
Curved corner showers have two square side that fit into the corner of two walls, and the outside edge is one continuous curve, usually with a glass door on wheels that slides open one way or another. The kit you go with may give you the choice of which side you want the door to open toward, or you may have to select left or right handed when purchasing the corner shower kit.
Neo angle has the outer corner cut off at a 45 degree angle, giving it a 5th side where the shower door will be located. The good thing about that is the door points toward the middle of the room, freeing up space to the left or right of the shower for toilet, sink, doorway or something else. But, the drawback is that corner that is angled for the shower door does cut into the square footage space for moving around inside the shower.
A square shaped corner shower offers the maximum amount of showering space inside, but the door faces squarely toward the left or the right, and since you need space there to step in & out of the shower, it prohibits you from placing anything right up close to the shower on that door side.
Tip: Various sizes are available too, but make sure not to go too small: less than 36″ on each wall side, and you’ll find yourself feeling cramped and hitting your elbows! I think 42″ on each wall side is good enough (48″ would be ideal), but you may be constrained to dimensions less than that if your bathroom is small.
2. Frame, Minimal Frame, or Frameless
Corner shower glass enclosures are available with 1) prominent metal frames around edges of the glass walls and door, 2) metal frames that are much smaller, thinner, or don’t stand out as much, or 3) no frame at all, glass edges exposed.
This is a question mainly of taste – which style fits your desired bathroom theme & look – but also of budget. There is no right or wrong.
Most ready-to-install kits come with framed glass walls & doors, but you’ll find some with more modern, sleek, minimal frame options. To go truly frameless, you will either need to buy a high-end corner shower kit, or build your own and have a local glazing company install the frameless shower walls & door for you.
3. Pivot Door or Slide Door
Whether you’re buying a kit or building your own, you’ll need to choose whether you want the shower door to hinge/pivot, or slide open.
If you’re limited on floor space, a corner shower with a door that slides open may be your best choice, so the door doesn’t swing out into the room.
Also, for some people, it’s a nuisance when water drips down onto the floor from an open swinging door.
4. Curb Height
The curb is the outer edge of the shower pan that keeps water inside, the “lip” that you have to step over.
Although the standard for years has been the regular curb that is several inches high and several inches wide, more options are available today to fit modern styles and needs.
You can have a shower pan with a “low profile” curb, which is still high enough you have to step over it, but is lower, offering a more modern look.
Zero-entry showers have become more popular as well, somewhat for the look and design aspect, but especially for handicap accessibility and ease of use walking in and out of the shower. You won’t find many pre-made kits with this option, as it requires a few more steps in construction to build properly and set down into the floor, so the level matches properly with the bathroom floor. But if you’re building your own shower and want a zero-entry curb, it can definitely be done with products & materials available online today, along with our guide here on how to build your own shower.
5. Kit or Build Your Own
Building your own custom corner shower can be done if you have medium to high DIY skills, and you’ll love the result. Nothing beats the look of a luxurious tile shower built to fit your bathroom, your taste, and your style. But it does take a lot of work to get it done right.
Kits are easy to install, following instructions provided, and can be done quickly – in one afternoon or full day for a novice Do-It-Yourselfer. Corner shower kits will also be dramatically cheaper than a custom built corner shower.
Kits will include a shower base, shower walls, glass enclosure, and hardware/accessories. Typically made fiberglass or acrylic, they can be one piece or multiple pieces. One piece units are really only used in new construction, where the unit that’s larger than most doorways, can be set in place in the framing stage of construction. Multi piece kits that are the most common for bathroom renovations, found at local home improvement stores and online at places like Amazon, have interlocking designs that connect the walls to the base, ensuring no leaks will occur.
In the past, kits like these had a reputation of being flimsy, cheap, and not very attractive.
Today, however, you can choose from many shower kits on the market that are much higher quality, with a wide variety of color and design options. Having installed many custom tile showers myself, I always lean toward having a custom made tile shower, which provides the most dramatic finished product…but with some of the more premium quality shower kits available today, the decision between custom built or kit isn’t as clear cut as it used to be!
Kits are going to be less expensive and faster to install, giving you a slightly less “high end” look. Whereas, custom built shower will cost more and take more time to install but give the most high end, custom, luxurious result.
Our Choices for the 5 Best Corner Shower Stall Kits on Amazon
With just a quick look at shower kits available online, you’ll see how overwhelming the process can be, with a seemingly endless number of them to choose from.
Luckily for you, we’ve done some of the hard work for you, sorting through them to find some of the best options for you!
We have come up with the list below of our top choices, after taking into consideration such factors as customer ratings & reviews, durability, design, price, features, warranties, and more.
Ultimately, you’ll have to choose which model best fits your needs, taste, and budget, but if you’re going to buy a ready-to-install corner shower kit, these recommendations and the “Options to Consider” we talked about above will give you a great jumpstart on the process.
1. DreamLine Prism 34 1/8″ x 72″ Frameless Neo-Angle Pivot Shower Enclosure in Brushed Nickel
This shower kit takes the Top Spot on our list with its reasonable price, 3.6 out of 5 stars, and sleek, modern minimal-frame style. If the dimensions of the base fit your bathroom’s size and layout, it could be the perfect choice for a modern bathroom remodel on a budget.
2. Ove Decors Breeze Premium 31″ Shower Kit
At just 31″ wide on each corner side, it’s good for bathrooms with limited space, but pretty narrow otherwise. However, what helps make it feel larger is the curved outer glass, which actually curves outward slightly, adding to the dimensions inside.

3. Vigo 36″ x 48″ Frameless Rectangular Sliding Shower Door Enclosure with Tempered Glass
While slightly more expensive, this kit from Vigo provides both a frameless look and the potential to have a zero-entry shower floor. The kit includes Vigo’s “Seal-thru” waterproofing technology to seal the glass/floor connection point, and their Smart-Adjust technology allows for movement and shifting over time.
It is available in both 36″ x 48″ and 36″ x 60″.

4. DreamLine 38″ x 38″ Curved Shower Enclosure & Base
Perfect for small spaces where a swinging door won’t work, this kit from DreamLine has a curved neo-round design with sliding doors. The base is made of scratch and stain resistant acrylic, and the floor has slip resistant texture.
With a 5 out of 5 star rating on Amazon, customers have really liked what they’ve gotten with this model.

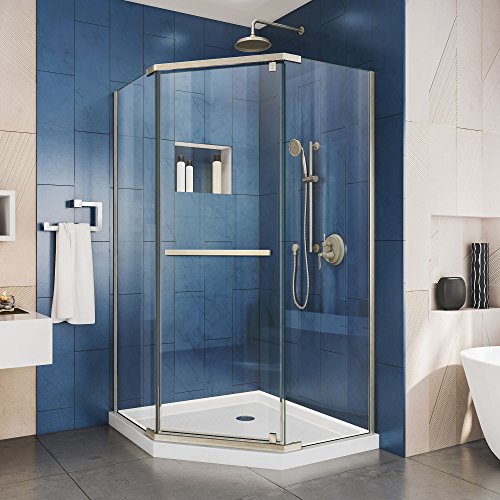
5. Aston Neoscape Frameless Neo-Angle Shower Enclosure with Glass Shelves
We chose this model because it offers such a modern look with completely frameless shower walls and door, and stainless steel hardware.
It has a 5 out of 5 star rating, and customers left some great reviews on the quality of look of the finished product they received.

Other Great Brand Options:
1. Onyx
Onyx is a company offers 100% USA Made pieces for bathrooms and countertops, including shower pans and shower walls. Onyx is made of a high-density composite that is solid, sturdy, with a granite look, and can be custom manufactured to any size and shape that you specify. They are installed as solid pieces, each wall being one single piece that is simply adhered to the sheetrock on the wall with silicone and the joint between the walls and the floor shower pan are caulked with a color-matching silicone.
Here, you can see over 60 colors and patterns available to choose from, and you can even get free color samples sent to your home before you decide which one you want…


Their corner shower pans are available with curbs that are low profile, full height, double threshold, or ramp style.
Maintenance is quite simple on Onyx showers, not having lots of grout lines like tile walls that can attract mold, mildew and scum build-up. You can clean an Onyx shower with everyday household cleaners, while abrasive cleaners should be avoided, as they will dull the glossy gel-coat surface.
Guaranteed to last a lifetime, never needing re-grouting or re-sealing, they’ve become a popular option for people who are more concerned with maintenance. An Onyx shower will typically cost more than tile or fiberglass, but installation costs should be less than a custom tile shower, since each wall is one solid piece.
If you get a custom corner shower pan & shower walls from Onyx for your corner shower stall, you’ll also need to find the glass shower walls & door that you’ll want, either a pre-made kit online, from your local home improvement store, or custom glass panels from a local glazier.
Here is an Onyx corner shower with Neo Angle shower pan, and a built in shower niche in one wall…

And, here is a corner shower with an Onyx Neo Angle Shower Pan, and custom tile walls. It will still need glass panels & door installed.

2. Swanstone
Very similar to Onyx product, Swanstone shower bases and shower surrounds are single solid pieces that make installation easy. They come in a variety of colors/patterns, shapes, curb heights, etc.
Bases have pebbled, slip-resistant surfaces, are reinforced underneath for support and strength, and the colors run all the way through the material (not only on the surface)
Shower walls can have smooth, subway tile, or square tile patterns, giving you options for the look you want.

How To Install A Corner Shower Kit
Most kits come with instructions that are quite good and sufficient to get you through the installation process, but we’ll go ahead and give you a run down of the process, so you can be prepared!
Tools to Have Ready Before You Start
- Measuring tape
- Utility knife
- Drill & hole saw
- Caulking gun
- Level
- Adhesive
- Silicone caulk
Step-by-Step Process For Installing Your Corner Shower Kit
- Inspect kit contents – A corner shower kit usually includes the base, shower walls, glass side-walls, a glass door, and a package of hardware and/or accessories. Check the instructions included to ensure all contents supposed to be in the box actually are.
- Prepare the shower location – Make sure the floor is framed sufficiently to solidly support the shower base, and the wall has studs framed in the right places according to what your kit’s instructions call for. Make sure plumbing for shower valve, shower head(s), and drain are all complete.
- Install the floor drain – This step depends on the particular shower kit you have – the included instructions will give specific details – but in general, you’ll attach a drain piece with gasket or seal to the shower base, fasten by tightening a large nut/ring on the bottom side. A piece of PVC pipe is connected with PVC cement to this drain piece on the bottom of the shower base, so that when the base is set on the floor, that PVC pipe will connect to a rough-plumbing PVC fitting below the floor.
- Install the base – To ensure a solid footing for your shower base, spread a 1″ thick layer of drywall joint compound on the floor, and press the shower base into the joint compound as you set it. This will give a solid base and limit creaking and crackling of the floor as you move around on it while showering. Also be sure to properly connect the drain piece explained previously with your home’s drain plumbing. The kit you have may also have metal clips or tabs to install on wall studs to hold base firmly in place.
- Drill holes in wall panel for shower fixtures – Measure the location of the shower valve and shower head, measuring over from the inner corner and up from the base. Drill a hole for the shower head pipe using a 3/4″ Forstner bit, and drill a hole for the shower valve assembly with the hole size required for your particular shower valve.
- Install the wall panels – Follow instructions provided to install the two wall panels on top of the base. Test fit first to make sure they’re level. Remove the panels and set aside. Apply silicone caulking as directed by your kit’s instructions to stud walls and top of shower base, then install shower wall panels, for good this time, pressing firmly into the caulk you just applied. Your panels may need fastened to the wall along a top flange with galvanized roofing nails, if called for by your particular kit’s manufacturer.
- Install the glass walls and door panel – Attach the glass panel retaining channels to the previously installed shower wall panels. Then install the glass panels in the retaining channels. Finally, install the shower door following the exact instructions specific to your shower kit.
- Caulk corners, edges, and joints – Apply a bead of caulk along edges. Let dry for 24 hours before using the shower.
Some Helpful Videos For Corner Shower Installation Clarity
Below are a few videos from the interwebs that will give you a great overview of the installation process of the average corner shower kit
This video from American Standard…
This video from Delta explains how to install their kit’s shower base…
And this video, also from Delta, explains how to install the enclosure walls after the base has been set…
Building Your Own Corner Shower Stall
Design ideas: Check back soon and we’ll have more here to help you with designing your custom built corner shower stall.
Here are some great Tile Shower DIY posts that will get you squared away on building your own custom shower:

How To Keep Your Corner Shower Clean
For regular cleaning, what I like best is quite simple and cheap: liquid soap, water, and a non-abrasive cleaning pad. Abrasive cleaners will scratch and dull the glossy acrylic surface of the shower panels.
Keep a squeegee hanging in the shower, and use it after each shower to get excess water off the shower walls and glass panels. This is especially helpful if you have hard water, which lends to a build up of scum very quickly without regular cleaning.
