There are two components of a shower that can drastically alter the look of your shower, and give you a lot of freedom in your shower design. The first is going curbless, and the second is giving a little attention to the standard old drain.
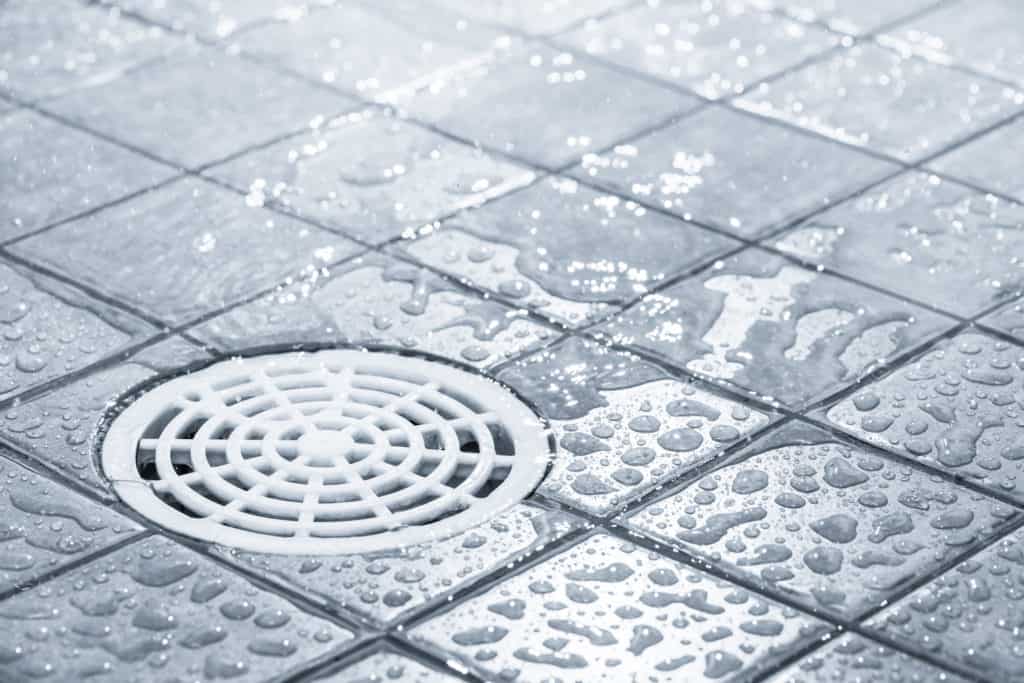
For most of the modern shower’s history, the drain was pretty standard: a round or square grate about 4″ x 4″ somewhere in the middle of the shower floor, with the floor sloping downward toward it from all corners and sides of the shower. The drain grate was typically not all too attractive, and simply served the purpose of allowing water to drain away out of the shower.
But over the last few years, as custom shower design for the average household has become extremely popular, a wide range of products have become available making it more affordable and achievable by the average person.
Today, a linear drain is among the top trends in home shower design. They add the ultimate modern touch, with their slim profile, clean lines, minimal visual impact, and placement out of the way.
…to the modern, sleek, stylish linear drain…

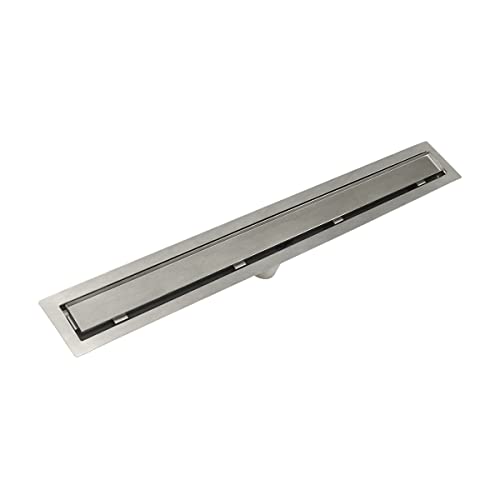
Linear shower drain with stainless steel surface, from Easy Drain USA (see more below)
What Is A Linear Shower Drain?
Linear shower drains consist of a trough that is installed below shower floor level, connected to the standard drain line plumbing, and a decorative top that could be a metal grate or covered by tile to match the rest of the shower floor. The shower floor slopes toward the linear drain in one single plane of slope, altogether making for a cleaner, more modern, sleeker finished shower.
Benefits of Using a Linear Drain
The primary benefit is that it’s easier to tile the floor using a linear drain, and you can use any size of tile you want.
With a standard point drain, if you’re using larger tiles, you end up having to cut diagonal lines and triangular pieces of tile to get it to all slope conically toward the drain which is typically toward the center of the shower…or you’ll have to use smaller than 4″ tiles. Whereas, with a linear drain, you will have it placed along one side of the shower, and the floor will have one singular plane sloping toward the drain, making it much easier in the cuts you have to make for those floor tiles.
With a standard drain, you will likely end up using smaller tiles, like 4″x4″ tiles or smaller yet mosaic tiles, because they fit the slope of the floor better than larger tiles. But, with a linear shower drain and one sloping plane, you can use as large of tiles as you like.
Lastly, because you can use large format tiles with the use of a linear floor drain, you can also greatly reduce the number of grout lines and joints where mold, mildew, and grime can easily accumulate.
This video from Schluter (a well-known and high-quality manufacturer of shower waterproofing products) and home-improvement television personality, Mike Holmes, shows the installation of a curbless shower with linear drain, as they talk through the benefits of using the linear drain in new custom shower designs…
What’s the Downside?
Really the only downside is the added cost. They have been quite a bit more expensive than a standard center point drain – although costs have come down over the last few years as more competition has entered the space – but those who really want the look of a linear drain know they’re getting premium style & visual appeal for their added cost.
Linear Drain Placement in the Shower
The linear drain offers a lot of flexibility and can be installed virtually anywhere in the shower. While typically toward the back or one side wall, linear drains can also be placed in the middle of the shower, or are often placed across the front/entry of the shower when there is no threshold or curb.
When a linear drain is placed close to a side wall of the shower, some models have a small space between the drain and the wall that need tiled, while others are made to be installed directly against the side wall with no space.
Flexibility of placement:
- Directly along the shower wall – no space between drain grate and wall tile
- Parallel to wall with small space – gap of a few inches would be filled with shower floor tile
- In the middle of the floor – just like a standard round drain, the linear drain can be placed in the middle of the shower and have the floor sloping down to it from both sides
- At the shower entrance – running parallel to the shower entrance or shower door
Linear Shower Drain Styles & Design
As more and more companies have begun offering their own versions of linear shower drains, a wider array of styles and designs have come along with it. Today, there are basically three styles to choose from for the top surface of the drain:
- Decorative metal grate – could be brushed or polished stainless steel, chrome, oil-rubbed bronze, nickel, etc., and you’ll see them with all kinds of cutout patterns, from very simple singular drain line, to all kinds of interesting patterns
- Tiled top to match shower floor tile
- Invisible drain – with the goal of drawing very little attention to the drain, these are made to have a “slit” type of drain
Popular Brands
More and more companies are entering the linear drain market as the demand for them in custom residential tile showers continues growing. As a homeowner and do-it-yourselfer, it can be difficult for you to sort through the huge number of options out there and know which are the best to choose from.
Never fear…we’ve done some of the hard work for you. Having knowledge of the industry and experience using some of these products, we can recommend a few brands that are known for their high quality, that are respected among the professional installers, have a great track record of durability and working well, and of course that look great with modern styling and designs to choose from.
Infinity Drain

An example of one of Infinity Drain’s many linear drain styles from their website’s image gallery
Infinity Drain, based out of New York state, offers linear drains that are either a fixed length or site-sizeable, meaning you buy them in various standard lengths, and then they can be cut on site to fit the exact shower dimensions needed. They have drains with the option of having a Schluter Kerdi flange built into the product, making for easy and dependable waterproofing of the drain as you tie it into the waterproofed shower floor.

You can go to Infinity Drain’s website to find a dealer near you, or you can also browse many of their available drains and other products on their Amazon store.
This drain kit is just one of many Infinity Drain has available on Amazon…they have various lengths and drain grate styles. Browse all of the Infinity Drain models that are available on Amazon here.
Easy Drain

Easy Drains USA is subsidiary company of Easy Sanitary Solutions, out of Germany & The Netherlands, a family owned company that’s been around since 1928…and now they offer an impressive series of linear shower drains called Modulo TAF (Tile Adjustable Frame). Their patented TAF technology provides a height adjustable frame that is adjustable to tile thicknesss from 1/4″ to 3/4″, and WPS (Water Protection System) offers secondary drainage below the tile surface (since tile & grout are porous), with the use of a pre-assembled sealing membrane. They back up their claim of a 100% watertight installation with a 10-year warranty.

Here you can see the components of the Modulo adjustable linear drains and how they’re constructed.
They also offer a series called Modulo Nano with the same technology but having an even slimmer and minimalist design.
Both Modulo and ModuloNano allow you the flexibility of choice in grate finish, including: brushed stainless steel, glass, or your own bathroom tile to match the surrounding floor.

You can create such a modern, minimalist look with the use of linear shower drains like these from Easy Drain

Here’s an example of one of their drains with a tile grate surface, which allows you to mount a piece of tile inside the grate assembly that matches the surrounding floor tile.
Check out Easy Drain USA’s website to find a dealer near you.
Schluter
Schluter Systems is the brand I’m most familiar with, through years of personal experience using their products. They offer many products in the shower waterproofing space, such as Kerdi, a waterproofing membrane applied to shower walls and floors with thinset, and complete shower systems that include waterproofing materials, a foam shower floor tray, and drain piece.
— You can see the page where we give a thorough review of almost all the products Schluter offers here —
Today, they offer a series of linear shower drains under the name Schluter Kerdi-Line. Kerdi-Line drains are low profile linear drains that are specifically designed for use with bonded waterproofing assemblies – such as with their Kerdi products. These drains from Schluter can be installed directly adjacent to a shower wall or elsewhere in the shower wherever desired.

They’re well-built, the channel body being made of formed stainless steel and they have an integrated Kerdi collar to help you create a waterproof connection with the surrounding waterproofing membrane on the shower floor.
You can find these drains in varying lengths on Amazon, from 20 inches long up to 72 inches long.
The drain grates come in several options:
- Frameless tileable – the finished product will be a piece of tile that matches your surrounding shower floor tile, with a thin drain slit all the way around the piece of tile
- Closed design with stainless steel finish – a solid metal surface flanked by two thin drain slits running the length of the drain
- Perforated design with stainless steel finish – a metal grate with perforated square holes across the entire surface of the grate
- Kerdi-Line Style – much like the perforated grate, with a brushed stainless steel surface, except with your choice between 3 decorative patterns: Floral, Curve, and Pure
When browsing the length and various design options, make note that the surface grate is sold separately: so you’ll need to buy the drain assembly of the length you need, and also pick out the grate style you want to buy.
This short video from Schluter will go through the options to help you select the drain model that’s best for your situation:

Quick Drain
One unique product QuickDrain offers is their “WallDrain”, which is actually installed in the wall. This linear shower drain has no decorative metal grate. Instead, the water runs down the slope of the floor into a drain channel that is hidden behind the wall, and that drain channel opening is concealed by a vertical tile cover (to match wall tile) that attaches magnetically.
The WallDrain is made to extend across the full width of the shower floor, which helps promote better drainage and provides a clean visual line all the way across the shower wall. The company boasts that their WallDrain product can adapt to almost any existing plumbing conditions and can be integrated with either a poured shower pan or their own “Quickslope rigid-foam panels”, which is an environmentally friendly product, made from recycled plastic bottles.
Noble Company

The Noble Company offers FreeStyle Linear Drains available through dealers spread around the United States, and you can find one near you on their website.
The FreeStyle Linear Drain offer a complete waterproofing system for both thin-bed and full mortar bed installations using Noble Company waterproofing sheet membranes such as NobleSeal, ValueSeal, and Chloraloy, and the ProBase II single-slope kit, which simplifies the installation of the shower slope meeting up to the drain.

Some key features & benefits of the FreeStyle:
- The base is constructed of either ABS or PVC, so it will make it easy to connect to whatever waste lines you have.
- The hole drain location can be either offset or centered, giving flexibility in location of drain related to existing drain lines.
- The drain connection of the base fastens directly to your standard 2″ waste pipe, eliminating the use of a coupler that could leak or cause failure.
- The channel body has a flat base, so no shimming or leveling is needed.
- One-piece seamless base construction
- It has a high drain capacity of 36 gallons per minute, allowing for use in large showers with multiple shower heads.
- Available in 5 strainer styles
- Available in 7 lengths: 24″, 32″, 36″, 40″, 48″, 54″, and 60″

This shower was built using the Noble Company FreeStyle Linear Drain with tileable strainer, so the finished surface is the same tile as the surrounding shower floor.

Here you see the linear drain with the Cross Hatch style strainer grate, just 1 of 5 available strainer designs.
Again, you can find out more about the Noble Company’s FreeStyle Linear drain on their website and find a dealer near you.
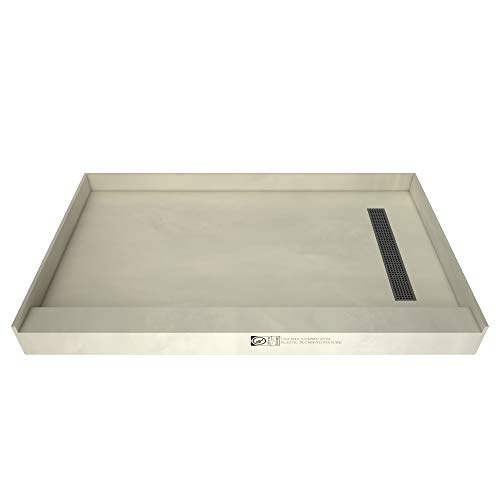
Tile-Redi
This one is a bit different than every brand mentioned previously. Unlike all of the other brands marketing the actual drain or drain kit, Tile-Redi is a company that manufactures ready-to-install waterproof shower pans. The name Tile-Redi comes from the fact that these pans are made of a composite material that you can install the shower floor tile directly on top of.
While they don’t lend themselves as well to custom shower applications, ones with unique dimensions and shapes, if you have one of the fairly standard shower sizes, and want to save on some labor in building/installing a waterproof shower pan, a Tile Redi pan could be the ticket for you.
They offer a whole range of shower pans, various sizes and shapes, curb heights and curb locations (front, left, right, etc.), and they also have two series of models that have linear drains built-in: Redi Trench and WonderFall Trench.
If you click on the button above to browse the Tile Redi “Redi-Trench” shower pans on Amazon, you’ll notice you can choose from many options, including:
- Dimensions of the shower pan, such as 48″x34″, 48″x30″, etc.
- Type of drain grate – tileable top grate, right or left designer grate
- Finish of the drain grate, such as brushed nickel, polished chrome, oil-rubbed bronze, or matte black
- Front curb only, right or left additional curbs
How To Install a Linear Shower Drain
DIY Disclaimer: As with any home project involving the support structure of the house, electricity, or plumbing, it’s imperative that you know what you’re doing, and that it’s within your skillset and expertise to tackle the project – both for your safety and the integrity of the home. I know if you’re like me, you love spending time working on and around your house, making improvements, and accomplishing projects, but if there is any portion of the project you don’t feel 100% confident in, do not hesitate to hire a licensed professional…and don’t let that hurt your pride either!
Also, be sure to check with your local city or county code enforcement agency to be sure you’re compliant with all codes, permitting, and regulations.
DIY Difficulty Level: Challenging – 4 out 5 – A linear drain is going to be installed in a new shower build, which will include waterproofing to ensure a complete waterproof shower, and also installing tile, so multiple skillsets are required and a lot of responsibility for getting it absolutely correct is on the line.
What Could Go Wrong? Water inside your house is one of the biggest problems you could have in your home. It doesn’t take much time, or very much water, to cause a lot of damage to the structure of your house, through rot and/or mold. And the shower is the one location in the house with the most amount of water usage on a consistent daily basis, separated from the structure of your home by just a few key layers. And, you would be surprised by how small of an opening or weak point can let through a considerable amount of water.
So, it’s critical to get that waterproofing done absolutely correctly, or else you could be tearing out the entire shower in the near future, and fixing rotted house structure where it was exposed to a water leak.
…With all of that said, if you have the knowledge, expertise, and skillset to tackle a project like this, it is very rewarding at the end to know your custom tile shower and bathroom were the work of your hands and it can be something to be proud of when you show it off to friends, family, and guests.
Helpful YouTube How-To Videos:
I often find watching some how-to videos to be the most helpful way to learn and understand the process of doing a task correctly. So here are some of the best videos I’ve found that walk through the process of installing your line drain.
Schluter Systems of North America has this helpful video on their YouTube channel showing how to properly install their Kerdi-Line linear shower drain models.
This video from Schluter shows how to install the Kerdi-Lane channel directly adjacent to a tiled shower wall, and how to install the tileable drain grate.
If you don’t have access below the floor space to attach the drain line after installing the linear drain channel, this video from Schluter will walk you through how to install the drain channel body with drain coupler to the existing plumbing, all from above the floor.
The following set of videos are from a professional tile contractor in California, Isaac Ostrom, on his YouTube channel “Tile Coach“. I don’t know him personally, and he’s not connected to or affiliated with Tile Shower DIY in any way…I just really like the videos he produces, and I think in this case on the topic of linear shower drains he does an excellent job walking through the process of installing one and gives out a lot of tips and knowledge he’s learned from years of experience building custom showers for customers.
I’ll share the videos from Isaac’s channel below that are relevant to the topic at hand, and then list out some of the key points he makes below each video. I’d recommend watching the whole videos – they’re tremendously helpful – but I’ll list below each video only the parts that pertain to the linear shower drain:
- 2:00 – he unboxes the linear drain, showing the channel body, Kerdi flange, drain coupling, and accessories
- 11:30 – Isaac explains when to use Modified Thinset
- 12:00 – they begin installation of the line drain channel body and drain coupler
- 13:45 – making sure the channel body is level
- 15:20 – after installing the foam floor tray, they begin adhering the line drain’s built-in Kerdi flange/flap to the surrounding shower walls and floor
- 17:30 – they show a “Pro Tip” of using two trowels while bonding the flap into corners
- 18:20 – Isaac emphasizes the need to really burn in the fleece backing of the Kerdi flange to Kerdi on the shower walls…a process that ensures the two membranes are bonded together as well as can be
- 19:00 – use Kerdi Fix to fully ensure corners are waterproof
In the next video, Isaac goes through the process of waterproofing the shower floor and walls around the linear drain after the dry pack floor has cured. It’s not the same shower as the previous video – this one is curbless vs the other with a curb – but very similar situations…
- 1:30 – Isaac spreads the thinset and explains the proper trowel and consistency of the thinset, as he bonds the drain body Kerdi flange to the shower floor and walls
- 3:00 – watch as he works with the corners which can be tricky to get just right
- 4:50 – he explains a problem common to all waterproofing sheet membranes, wrinkles that makes it more difficult to get perfect, and how he fixes the situation with a roll-on sealant (Ardex 8+9) as an extra layer of protection
- 6:45 – Isaac applies thinset over the Kerdi flange of the drain body as he prepares to lay the sheet membrane over it for the shower floor
- 9:30 – he talks a bit more about the challenge of getting sheet membranes to lay perfectly flat in all the corners, edges, and where various slopes and planes intersect – how it’s challenging even for a professional tile setter like him – and how he makes sure to get it waterproof with the additional use of Ardex 8+9 roll-on cementitious waterproofing
- 12:10 – he begins mixing the 8 plus 9 and applies it to the shower for that extra step of waterproofing – as he says, “the extra 30 minutes of work helps him sleep better at night, knowing it won’t leak.”
Here, Isaac will show how to install and waterproof the line drain when it’s right along a wall. In the video before, you saw him installing it with a couple inch space of shower floor between the drain and the wall. But here, you can see what to do with your shower drain installation if you have it directly adjacent to a wall.
- 1:00 – how to carefully cut the membrane in the proper way to get the built-in Kerdi flange to seal the corner correctly, without having too much build-up of membrane material in the corners
- 1:50 – reiterating that he likes to apply a bead of Kerdi Fix in the corners for extra waterproofing protection
- 3:45 – he bonds the side flaps to the side walls first
- 4:00 – how to hold the membrane with one trowel, to hold it firmly in place, while you pull away with a second trowel to squeeze out excess thinset and bond the fleece to the thinset
- 5:30 – see Isaac apply that Kerdi Fix to the corners
Here’s yet another example of installing the Kerdi Line drain, this time with a slab foundation. In this case, Isaac has installed the Kerdi-Line drain assembly, connecting it to the existing plumbing, and he shows how to add the dry pack mortar up to and around the drain assembly, preparing the base waterproofing and then tile will be applied to. This would be an alternate method for you to use of building the base for the shower yourself if you don’t want to use pre-made foam trays.
Isaac gives some great advice on how to properly apply a dry pack deck mud over a slab foundation, to get it to bond properly…but I’ll just bullet point some of the parts that are particularly relevant to the linear drain installation:
- 2:20 – see how to level up the drain channel body
- 3:30 – packing the deck mud behind the channel body, to fill all voids between it and the wall
In the next video, Isaac follows up on the same shower install, showing how to waterproof around the linear drain after it’s been installed and the floor pan has cured overnight. Most of the steps are the same as a few of the previous videos, so no need for more bullet points, but this could be good to watch for some repetition of the proper steps.
Project Inspiration: linear shower drain examples
For some inspiration on your tile shower project, I’ve created a Pinterest Board and compiled some examples of linear shower drains and pictures of custom showers to get you started on planning your shower project and help you choose a linear drain that would work for your situation.
An example of a linear shower drain being placed along the entry of the shower, below the swinging glass door.
This shower has one of Infinity Drain’s customizable Tiled-In Linear Drains, which has a tile face to the top of the drain piece to match surrounding shower floor tile.
This perimeter drain with tile-in frame gives a very unique look to this open shower concept…definitely a one-of-a-kind.
A classy look is made with chrome fixtures, glass tiles, and a running bond mosaic floor tile, along with the sharp looking linear drain.
This linear drain almost completely disappears with its thin design and placement along the shower bench.